Wright's Shed Company
Wednesday, August 27, 2014
Monday, June 2, 2014
Wednesday, May 28, 2014
Sunday, April 20, 2014
2014 Shed Install Pictures and Instructions
 |
| The floor sheeting should square the floor....just make sure all sides line up. |
 |
| Be sure to nail the sheeting on each joist. ( You may need to run a chalk line to mark the joists.) |
 |
| When putting the walls on the floor make sure the bottom plate is tight to the floor. If your ground is not level this may require you to pry up the floor. |
 |
| Nail every 6" of the "skirt". It's best to use galvanized nails for the exterior. |
 |
| Mark the center of the peaked wall for the ridge beam. |
 |
| Nail trusses every 2'. When marking peak siding, make sure to line up the siding lines and do the big pieces on both sides first so you can use the left over siding for the smaller pieces. |
 |
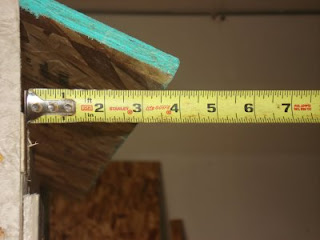
| On the standard shed, overhang the roof sheeting 3 1/2". |
 |
| Nail roof sheeting to trusses every 4"-6". |
 |
| Add blocking under the overhangs. |
 |
| Nail overhang/L - shaped trim into blocks. Hold and mark front peak trim. |
 |
| After trim is marked, cut to size and nail to outside edge with small finish nails. |
 |
| Put up corner pieces. |
Saturday, April 19, 2014
Chicken Coop Instructions

Make sure legs are square, and either screw in or lag bolt in.
Trusses need to be nailed on the X's. Outside siding needs to be cut once trusses are up.
Hang over sheeting 3 1/2 inches
Place blocks under sheeting.
Attach L-shaped overhang to blocks.
View of walls....yours will appear different because holes are already cut out.
Mark and cut trim to line up with boxed eaves.
Cut siding and use on other side.
Subscribe to:
Posts (Atom)
.jpg)
.jpg)
.jpg)
.jpg)
.JPG)
.JPG)
.JPG)
-2.JPG)
.JPG)
.JPG)
.JPG)
.JPG)
.JPG)
.JPG)
.JPG)
.JPG)
.JPG)
.JPG)
.JPG)
.JPG)


